This post contains Affiliate links. Purchasing items through my affiliate links, mean I will get a small percentage of the sale at no extra cost to you! (Thank you!)
If you have bought yourself one of the Stationery Countdown Calendars this year, you may not realise that you have also bought some of the ingredients to make yourself a little junk journal. Since rebooting the shop, I've been very aware of the environmental impact when it comes to the products and packaging. This DIY can help you make the most of everything you receive in your calendar. It's something you can make before December even begins, so it's ready for you to add to each day.

If you do end up making yourself one of these mini junk journals, I would absolutely love to see how yours turned out! Considering it's mostly made from re-cycled items, I'm imagining that everyone's will look quite unique. Post a photo on Instagram and tag me, I might even share a few in another blogpost to give more inspiration!

The supplies and tools you will need are as follows, the bolded items you will find in your sticker calendar.
- Craft knife
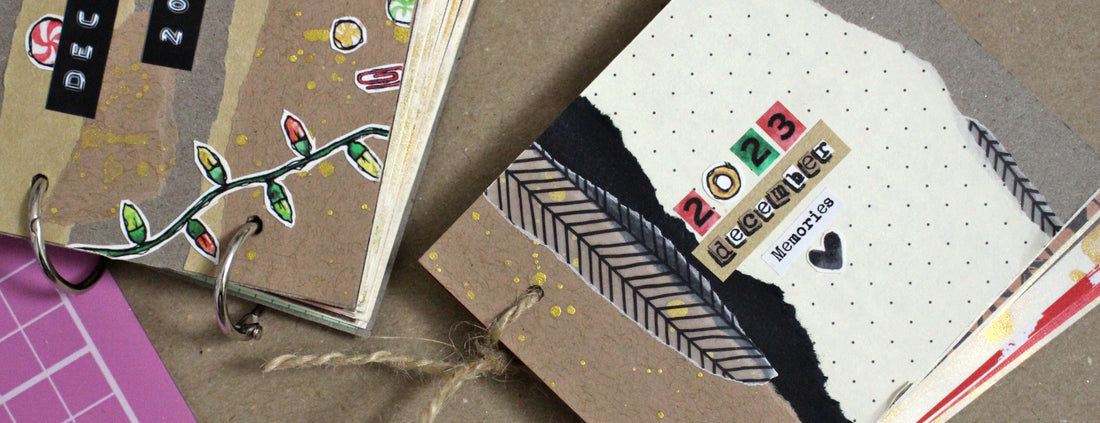
- Ruler
- Glue stick
- Cutting mat
- Hole punch
- Pencil
- Binder Rings/Twine
- Grey board
- Scrap paper
- Mini envelopes
- Decorative elements

1. Measure and cut two pieces of grey board down to 10 x 8cm. You can make them smaller or bigger, but I chose this size as it fits the largest envelope from the calendar perfectly. You can use the smaller pieces to create another journal (even mini-er!), or keep them for another project.

2. Measure and cut x25 pieces of scrap paper. I used a mixture of blank paper that I decorated with watercolours, and patterned paper from my scrap paper box.

3. Measure where you're going to punch the holes. I measured mine at 1cm in from the left, and 2cm in from the top and bottom. To punch the holes I used my We R Memory Keepers punch that has the option of slightly smaller holes. It's a clunky tool, but I wouldn't be without it now. It also lets me punch multiple pages at once to save a bit of time.

4. Using other pieces of scrap paper, and parts of the packaging (the kraft paper belly band can be used in this step), rip up some strips that you can use to collage and decorate the front of the journal. Don't worry about size, shape or how neat they are. Once they're layered together, wonkiness won't matter!

5. Decorate your front cover (and back if you fancy), using various paper scraps and pieces of decoration from the calendar packaging. I used some imagery from the info sheet, and used my craft knife to pick out some letters and spell out 'December'. I also used a phrase sticker that ... may ... or may not... be in one of the mini envelopes at some point in the month ... possibly ... maybe ...

6. Using some twine, thread the pages and covers together. To make sure you don't tie the twine too tightly which would mean you wouldn't be able to flip through the pages, lay it flat out as shown above. Tie the twine securely, but it doesn't need to be super tight. Whether you used twine or binder rings, the journal will likely end up a lot looser than the norm. But this is fine as once you begin adding things, it will be able to account for the extra bulk better.
Once you've tied your journal up, you're done!
A few things to note that might be helpful when making your journal:

Binder rings come in various sizes, if you're expecting to fill your junk journal with more than just writing, then getting ones that are bigger than 2.5cm might be your best bet. If you're planning to just add writing, then you might want to get some that are a little smaller instead. (Here is an affiliate link to some that measure 2.5cm on Amazon)

When opening your mini envelopes throughout the month, if you happen to tear one of the number stickers you can remove any part of the sticker using your craft knife.

You can then download the number stickers as a printable sheet (provided above), and print yourself a replacement. Alternatively, you could number them using something else entirely to save printing new ones. It's up to you! You may want to use these numbers in the junk journal, without the envelopes. As long as they are used for personal use only, I don't mind how you use them!

If you manage to open them with the number sticker intact, you can use a piece of scrap paper to cover the remaining sticky area. This way your mini envelopes can be opened and closed as much as you want without the risk of the sticker, sticking and ripping again. Seeing as they will be contained in a journal, they don't need to be able to close properly as the journal will be able to hold them all shut when its closed.

You'll find that some envelopes fill the entire page, and some fit nicely in the corners. I will be adding other scraps of paper around the smaller envelopes to write onto, and for the bigger envelopes I plan to put all the journaling inside.

Hopefully this has given a little bit of inspiration on how to use the packaging you receive alongside your calendar this year. I'm very much looking forward to filling this little journal out in December. I might print a few mini photos to go on each page too.
Enjoy having a little festive crafty session, and don't forget to tag me in your junk journal creations!

